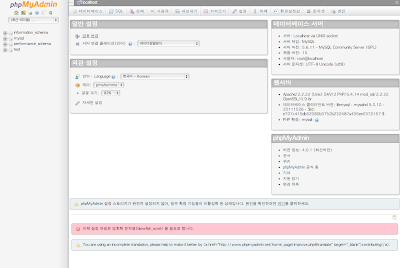
설치 하는 방법은 다음과 같다.
1. phpmyadmin 다운로드
phpmyadmin 사이트 에서 무료로 다운로드 가능하다. 현재 최신 버전이 4.0.1 이어서 phpMyAdmin-4.0.1-all-languages.zip 파일을 다운로드 받았다.
2. 압축 해제
다운로드 파일을 압축 해제 후, 사용하기 편하도록 디렉토리 명을 적당한 이름(phpmyadmin) 으로 변경 한다.
3. mac book 의 httpd 디렉토리로 이동
압축 해제한 phpmyadmin 디렉토리를 mac book 의 Site 디렉토리로 이동.
4. phpmyadmin 페이지 접속
웹 브라우저에서 http://localhost/~dhkim/phpMyAdmin/ 으로 접근 하면 phpmyadmin 최초 페이지를 확인 가능하다.
5. 로그인
root 암호와 패스워드를 넣고 접속 하면 일단 기본적인 접속 끝. 참고로 root 패스워드 없이 접근이 불가능하다.(mysql 의 root 패스워드가 설정 안되었다면 패스워드 부터 설정 해야 한다.)
화면 아래쪽에 분홍색도 보이고, 설치 어쩌고 저쩌고...하는 왠지 제대로 되지 않았다는 느낌이 팍팍 풍기는 안내 문구 들이 보인다. 내용이 무시 해도 될 것 같기도 하지만, 메시지가 보기 싫어서 해 달라는데로 해 주기로 한다.
6. phpMyAdmin 용 database, table 생성
phpMyAdmin 디렉토리에 보면 examples 라는 디렉토리가 보인다. 들어가 보면, create_tables.sql 이 존재한다. 이것으로 phpMyAdmin 용 테이블을 생성한다.
터미널로 mysql 접속하여 다음과 같이 하면 테이블 생성된다.
mysql> mysql -u 사용자계정 -p DB이름 < /path/examples/create_tables.sql
path 에는 phpMyAdmin 이 설치 되어 있는 경로이다.
아니면 create_tables.sql 파일 내용이 얼마 안되기 때문에, 명령어 복사하여 그대로 실행 해도 된다.
7. phpmyadmin 에서 사용하는 mysql account 생성
테이블이 생성 되었으니 phpMyAdmin 에서 사용하는 mysql account 를 생성한다. 터미널로 해도 되지만, 이미 phpMyAdmin 을 사용 할 수 있기 때문에, 이것을 이용하여 생성한다.
상단 메뉴 탭에서 "사용자" 를 선택해서 들어간 후, 기본 정보를 넣고 account 를 생성한다.
(일단 권한은 건드리지 말자...하나씩 차근 차근)
"사용자 추가" 까지 완료하면 사용자는 추가 되었는데, 6번 단계에서 만든 phpMyAdmin 용 database 를 사용할 권한은 아직까지 없다. 이젠 권한을 추가 하도록 하자.
다시 "사용자" 메뉴로 들어가면 추가한 account 가 보인다. "권한 설정" 을 선택하여 권한 설정 메뉴로 이동 한 후, "데이터 베이스에 관한 권한" 에서 phpmyadmin 을 선택하여 실행 버튼을 누른다.
드디어 phpmyadmin 데이터 베이스 에 대한 생성한 계정의 권한 설정으로 들어 왔다.
테이블 별로 권한을 줄 필요가 없기 때문에 다음과 같이 관리 권한만 빼고 모든 권한을 설정한다.(관리 권한은 필요 없겠지 아마도...)
8. phpMyAdmin 의 config 파일 추가/수정
phpMyAdmin 디렉토리를 보면 config.sample.inc.php 라는 파일이 존재한다. 이 파일을 config.inc.php 이름으로 복사하여 phpMyAdmin 디렉토리에 둔다.
아래 내용이 주석으로 막혀 있는 코드들을 모두 풀어 준다.
/* User used to manipulate with storage */
// $cfg['Servers'][$i]['controlhost'] = '';
// $cfg['Servers'][$i]['controluser'] = 'pma';
// $cfg['Servers'][$i]['controlpass'] = 'pmapass';

/* Storage database and tables */
// $cfg['Servers'][$i]['pmadb'] = 'phpmyadmin';
// $cfg['Servers'][$i]['bookmarktable'] = 'pma__bookmark';
// $cfg['Servers'][$i]['relation'] = 'pma__relation';
// $cfg['Servers'][$i]['table_info'] = 'pma__table_info';
// $cfg['Servers'][$i]['table_coords'] = 'pma__table_coords';
// $cfg['Servers'][$i]['pdf_pages'] = 'pma__pdf_pages';
// $cfg['Servers'][$i]['column_info'] = 'pma__column_info';
// $cfg['Servers'][$i]['history'] = 'pma__history';
// $cfg['Servers'][$i]['table_uiprefs'] = 'pma__table_uiprefs';
// $cfg['Servers'][$i]['tracking'] = 'pma__tracking';
// $cfg['Servers'][$i]['designer_coords'] = 'pma__designer_coords';
// $cfg['Servers'][$i]['userconfig'] = 'pma__userconfig';
// $cfg['Servers'][$i]['recent'] = 'pma__recent';
그리고, 'controlhost', 'controluser', 'controlpass' 에 mysql account 생성에서 사용한 값으로 변경 한다. 변경 후 다음과 같이 될 것이다.
/* User used to manipulate with storage */
$cfg['Servers'][$i]['controlhost'] = 'localhost';
$cfg['Servers'][$i]['controluser'] = 'pma_user';
$cfg['Servers'][$i]['controlpass'] = 'passpass';

/* Storage database and tables */
$cfg['Servers'][$i]['pmadb'] = 'phpmyadmin';
$cfg['Servers'][$i]['bookmarktable'] = 'pma__bookmark';
$cfg['Servers'][$i]['relation'] = 'pma__relation';
$cfg['Servers'][$i]['table_info'] = 'pma__table_info';
$cfg['Servers'][$i]['table_coords'] = 'pma__table_coords';
$cfg['Servers'][$i]['pdf_pages'] = 'pma__pdf_pages';
$cfg['Servers'][$i]['column_info'] = 'pma__column_info';
$cfg['Servers'][$i]['history'] = 'pma__history';
$cfg['Servers'][$i]['table_uiprefs'] = 'pma__table_uiprefs';
$cfg['Servers'][$i]['tracking'] = 'pma__tracking';
$cfg['Servers'][$i]['designer_coords'] = 'pma__designer_coords';
$cfg['Servers'][$i]['userconfig'] = 'pma__userconfig';
$cfg['Servers'][$i]['recent'] = 'pma__recent';
파일 저장 후, 웹 브라우저에서 phpMyAdmin 페이지를 다시 로그인 하면, 화면 하단의 안내 메시지들이 사라져 있다.(translation 관련 메시지는 보이는데, 이건 그냥 무시!)
9. 기타
이런 훌륭한 application 을 무료로 배포하는 것에 감사하며 phpMyAdmin 에 $1 라도 Donate !


댓글 없음:
댓글 쓰기